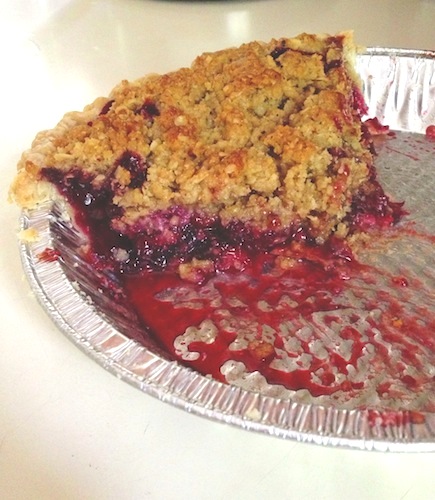
When I tweeted (this is me) and posted this pie on facebook (it’s how I keep up with family and annoy friends with pictures of food) there were immediate “please send me some of that” responses from family and friends. One person (Kris in Portland) wished that teleportation were a reality for this recipe.
I knew this blackberry dish would be one of envy because as soon as it came across my radar on Design Sponge I knew I had to have it.
Not being a person who chooses super sweet desserts (although I do crave them occasionally…made a small batch of these chocolate peanut butter no-bake cookies the other day), the combination of balsamic vinegar with tart berries and a sea salt walnut crumble had me pressing print before it really registered. Duh, I knew it would be great. (And it was all that I wanted and more.)
The harder part was that I kept the recipe in my folder with the idea to make it later and thus flipped through my recipe collection, smiling when I came to this pie, but passing over it like a weirdo who delays gratification. I am that weirdo in many areas of life who keeps and plans things for later. No instant pleasure here. Then I wonder why the hell I wait so long.
And this is that time. I should have made it several times over by now. That’s how long it’s been in my collection. Berry season is running behind here but that didn’t stop me (because I also believe the highlighted ingredient should be used in its ideal season…especially for something I put on a pedestal and waited so long to make) and bought the ones available even though they weren’t the prime example of delicious blackberries. (It was only a month ago we had a snowstorm in May.)
I did change the directions to accomodate my oven. So, the baking temp was 375F and not 400F. About 20 minutes in I placed aluminum foil over the whole thing since the crumble was baking much faster than the filling and crust. From there I just kept peaking to see if the filling was getting all bubbly then removed the foil for the last 10 or so minutes to let it brown the rest of the way. I found that it took some time to cool which helps thicken the filling and put it in the fridge for an hour or so then set it out to get to room temp. I thought the amount of crumble would be too much once I started placing it on the 9″ pie but it turned out just fine. If you want more berry flavor though you could reduce the crumble. The original creator has a pie crust recipe (follow the Design Sponge link above to get the pie crust instructions) but I found a great organic crust at my local co-op which I rely on in these busy days. (Wanna see what we’ve been up to? Check this out.)
I happened to have ice cream (rare these days) and salted caramel I’d made the weekend before-and nearly burned because I was busy wiping the cream off of myself since I knocked the measuring cup on its side when I touched the hot pan by accident and burned myself right (and I mean right) after Greg told me he enjoys watching me cook because I’m in my element so I of course immediately mess that idea up and start screaming since the burn hurt, I know the delicacy of making caramel and thought I had ruined the whole “beautiful” thing…can’t make this up/happens to me all the time-which was nice.
But the memory of that first slice, just the pie, is what sticks out pleasantly in my mind. It sincerely needs nothing.
Blackberry Balsamic Pie with Sea Salt Walnut Crumble from Adrienne at PieBox
Ingredients:
Note: This recipe is for a 9-inch deep-dish pie. If using a smaller pie pan, you may have some filling and crumble left over.
Pie crust (I used my favorite store-bought organic)
Filling-
4 1/2 cups fresh blackberries (about three 6 oz. containers)
1/2 cup sugar
1/4 cup brown sugar
2 tbsp + 1 tsp cornstarch
2 tbsp balsamic vinegar
zest of 1 lemon (great addition)
Crumble-
1 cup old-fashioned oats
1/2 cup all-purpose flour
1/2 cup brown sugar
1 cup chopped walnuts
1 tsp sea salt
4 oz (1 stick) unsalted butter, chilled and cut into small cubes
Place you store-bought (or homemade pie crust) on a baking sheet and preheat the oven to 375F. Meanwhile, mix blackberries, sugars, cornstarch, balsamic and lemon zest in a bowl. Turn the mixture with a spoon several times to ensure the blackberries are coated. Set aside.
In another bowl, stir the oats, flour, brown sugar, walnuts and sea salt together. Add the butter and rub into the mix with your fingertips, pressing the mixture together until clumps form.
Grab your pie crust on the baking sheet (no need to bake it somewhat first) and spoon the blackberry filling into it. Sprinkle the crumble on top, fully covering the blackberries. Bake the pie for 45–50 minutes or until filling is bubbling and topping is brown and crisp. Check the pie after 20 or so minutes of baking and cover the entire thing with aluminum foil to prevent the crumble from browning too fast. Remove the foil around the 35 to 40 minute mark to let it finish baking. Let the pie cool. I placed it in the fridge for an hour then put it out to reach room temp to help thicken it more.
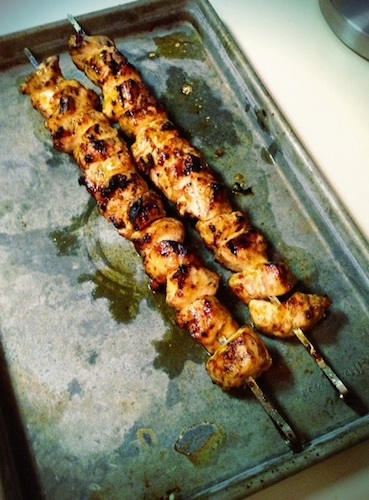
Are you grilling? We try to grill as often as we can in the months that are not winter or winter-like in Minnesota (so about 2 months…ha). Whether it be on a weekday evening or throughout the weekend in these warm spring/summer days we are outside getting our grill on. (I should note you can do this in your oven too. Just put it at 400F and place your bundles on a sheet lined with foil and roast for 12 or so minutes (that will vary).
For those of you who also said yes (and eat meat), I bring you bacon-wrapped asparagus. I probably could have said only bacon and grabbed the attention of many of you.
I had a few strips of bacon and a bunch of asparagus on hand so this happened, a bit of meat wrapped veg. It was a hit but I never had doubt.
Speaking of backyard, guess who gets to bring out the cultivator (or go buy one) and tear up their yard again this year because “winter kill” wiped out most of the yard that sprouted last year? We do! Not just the back but the front yard where inches upon inches of ice killed a large section. But we’re in the midst of putting in new patio pavers and some landscape edging so we’ll be outside anyway.
Who am I kidding, we prefer to be outdoors this time of year…but not so much repairing the same thing we did last year. Dead yard doesn’t scream “good for resale” but it does have me screaming “let’s move earlier” out of frustration.
Maybe soon we’ll actually have grass to look at while we’re eating our grilled whatevers.
Grilled Bacon-Wrapped Asparagus
Makes 6 bundles
Ingredients:
1 bunch of asparagus, about 24 to 30 spears, stems removed (I did the old snap method)
6 slices of bacon
1 1/2 tbsp olive oil
1 tsp garlic powder (or garlic salt-just skip the salt step then)
salt and pepper
*Prep your grill for high heat. In a small bowl, mix the olive oil and garlic powder (or garlic salt) and set aside. Take 4 or 5 pieces of aspragus (depending on how many spears you have) and wrap a piece of bacon around them. Continue to do this until you have 6 bundles. Take your oil mix and divide among the 6 bundles, brushing it everywhere. Don’t forget to coat your grill rack with some oil before placing them on. Add a little salt and pepper to each bundle. Place on the grill, turning once or twice, for 10 to 12 minutes or until bacon is crisp and asparagus is tender. Serve and enjoy!
*I should note you can do this in your oven too. Just put it at 400F and place your bundles on a sheet lined with foil and roast for 12 or so minutes (that will vary).
I don’t typically test recipes in the hopes of finding the best version of something in the world of sweets. Not much these days. Not as much as I do for savory dishes and snacks. I don’t like to keep many sweets around the house when it’s just the two of us.
My preference is for those savory, salty, spicy edibles…except when I’ve been void of sweets when trying to be a healthier person as I’ve been consciously doing. Then I get all mmmm, cookie, get in my mouth. I don’t care about your deliciousness status (as long as I get the impression it’s above mediocre), you are sugary sweet and I want you. It satisfies that short-lived craving then I’ll avoid eye contact with the remaining cookies for lack of care about the thing, instead grabbing chips or veg with dip or slices of deli turkey or roast beef which I crave way more than I care to admit.
I had precisely 1 1/2 of these dozen cookies (halved the recipe) and Greg had the rest…he has a problem. Do you crave something then have a rational portion of it and let your family and friends have the rest? Me neither except with sweets, have my satisfied bit then I’m over it but put some nachos or chips and dip/salsa in front of me and I can’t pull myself away. (Ahem I also nibbled on the batter and thus 1 1/2 cookies was sufficient for my craving and half because I shared with my pups sans the raisin part since they are harmful to dogs. Sometimes just having some of the batter suffices for me and I don’t even eat the finished whatever it is. Weirdo.)
My craving this oatmeal raisin cookie happened last week. I love oatmeal raisin cookies and probably because on the list of super sweet cookies it ranks pretty low. I’ve made a variety with oats here in the past. Cherry chocolate chunk cookies (I was obsessed for months), oatmeal chocolate chip cookies (the ones at Potbellys are my standard-grab those babies at the register), salted peanut butter oatmeal chocolate chip cookies and not quite the same type of cookie but with oatmeal nonetheless, chocolate peanut butter no-bake cookies from childhood.
All good, none above the others. To be fair I’d put the no-bake at the top but that’s due to sentimental reasons which have a habit of making things taste better (or give you the reaction of “why did I ever think this was good”…one of those 2 very different notions and nothing in-between in my experience). In terms of taste, these cookies were all great. So, I’m going to trust the original creator, Caroline from Whipped, who for years tested oatmeal raisin cookie recipes until she found the best version. This is it she says and dang, these were tasty.
The Best Oatmeal Raisin Cookies from Whipped
Makes about 24-28 large 3-inch cookies
Ingredients:
1 3/4 cups all purpose flour
1 tsp salt
1 tsp baking soda
1 cup (2 sticks) unsalted butter at room temperature
1 cup ganulated sugar
1 cup packed dark brown sugar
2 eggs
2 tsp pure vanilla extract
3 cups old fashioned rolled oats (not instant)
3/4 cup raisins
3/4 cup dried cranberries (or use 1 1/2 cups of regular raisins)
Preheat the oven to 350F. Combine the flour, baking soda and salt in a bowl. Whisk to combine. In another bowl, beat the butter and both sugars until light and fluffy, about 4 minutes. Add the eggs, one at a time, beating each until fully incorporated. Add the vanilla and stir. Add the flour mixture bit by bit, mixing until fully incorporated. Mix in the oats, raisins and cranberries (optional but increase raisins if not using them).
Put the dough in the refrigerator while you prepare your baking sheets, line each with parchment paper. After about 10-15 minutes, remove the dough from the refrigerator and spoon out large scoops of dough making balls about 1 to 1 1/2 inches thick. Place 6 balls on each pan, no more so they won’t be too close together. Bake the cookies for 10-12 minutes, turn them half way through. When you remove them from the oven, the edges should be lightly browned and the inside should look uncooked. Leave the cookies on the hot pan for 10 minutes you take them out of the oven where they will continue to cook a bit firming up the center. Enjoy!
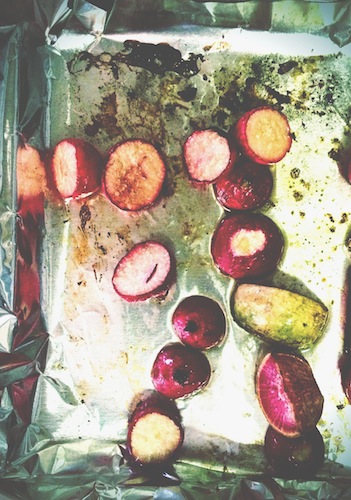
Roasted radishes are where it’s at, folks. Nothing new. Nothing difficult. Just radishes with some oil and vinegar, a smidge of salt and fresh pepper.
I noticed when spring rolled around-yeah, it finally arrived after some snow at the beginning of May here in Minnesota and a few other parts of the U.S. The last winter storm wiped out some tree branches around here and negated the yard cleaning we performed the weekend before. It’s still a mess we get to tackle this weekend.
But back to the radishes. I had some leftover from a pickled veg recipe that we used to top fish tacos and everything else (we love pickled things) that week. I had some watermelon and your standard variety radishes and thought the White on Rice Couple’s recipe sounded like the way to take these babies to Special Town. Population: roasted, somewhat sweet, less crisp radishes. Different from their normally crisp, peppery ways.
The watermelon variety did not roast long enough. Now that I see the picture, I realize they weren’t uniform in size which probably didn’t help and how did I miss that? Maybe it’s the regular chaos that life hands us we’re trying to cope with (the car needs repaired, the water softener stopped working, the dog needs spayed, we aren’t going to be able to do the house renovations we planned and some we need to do in order to see the return we expected, and we’re trying to figure out how we could move to Seattle earlier, etc.) and the fact that it was late and they had already taken much longer to roast than expected and I served them with herb risotto and you have to time those things just right to consume risotto as it’s meant to be consumed. Maybe it was that.
They were worth the wait and the less creamy risotto was still delicious. Which is seriously the least of our worries and fairly ridiculous after I read through this in the edit.
And happy Mother’s Day Sunday to all your terrific, hardworking, unconditional loving moms.
Roasted Radishes with Balsamic Vinegar
Serves 2 to 4 as a side dish
10 radishes (the original called to keep the tops and roast them too but mine came without), washed, roots and stem removed (keep your greens if you have them)
2 tbsp olive oil
2 tsp balsamic vinegar
1/2 tsp sea or kosher salt
black pepper
Preheat the oven to 350F. Make sure your radishes are washed, dried and I’d cut them in half. In a bowl, combine the olive oil, vinegar, salt and pepper. Whisk then toss in the radishes (and greens if you have them). Be sure all is evenly coated. Not required but it’s easier to place a sheet of foil on a roasting pan or baking sheet then spread the radishes (and greens) out. Roast for about 10 minutes or until the greens are crispy (again-if you have them). Remove the greens and continue roasting the radishes for about 5 more minutes or until tender. Mine took a bit longer. Serve and enjoy.
Speecy spicy and hotsy totsy like the Swedish Chef says from the Muppets. Could be the use of a habanero in place of a jalapeno in these snap peas. I was very pleased with this (yet another) Real Simple recipe.
Naturally though, I couldn’t stick too strictly to their version. That little habanero twist had our lips burning in the best way that heat loving people like Greg and I adore. Use a red jalapeno if you are not a heat-seeking foodie. That is if you’re looking for more visual interest use a red chili or red Fresno pepper or most of your dish will be green….like Kermit. How did I get on a Muppets kick? It’s not easy being green.
As you can see in the picture, I paired it with a breaded pork chop. A grand idea if I do say so myself. The heat and freshness spiked with lime went well with the fatty, heaviness of the chop. Top the snap peas with cilantro and peanuts for even more oomph. No bland side dish here and it’s ideal for spring which finally arrived in Minnesota. I’ll ignore the fact that they are calling for snow tomorrow. It won’t stick and I’ll be grilling soon enough on the patio. Right?
Chili-Lime Snap Peas
Serves 4
Ingredients:
kosher salt
1 lb. snap peas, trimmed
1 small habanero (if you like a heated kick) or red chili pepper (like A jalapeno or Fresno), thinly sliced or minced
1/4 cup roasted peanuts, chopped (smash them in a plastic baggie with a wooden spoon or measuring cup)
1/4 cup fresh cilantro leaves
2 tsp canola oil
1/2 tsp finely grated lime zest, plus 1 tbsp lime juice
Bring a medium pot of salted water to a boil and set up a bowl of ice water. Add the snap peas to the pot and cook until just tender, 1 to 2 minutes. Drain and transfer to the ice water then drain and pat dry. They should be bright green. Toss the snap peas with the chili, cilantro, oil, zest and juice with a pinch of salt in a bowl. Add the peanuts just before serving or they will become soggy.
Hey, there’s a weekend coming up. You should make this. It was a hit at our house last weekend. Egg in a hole or the old egg in a basket or egg in a nest. Whatever you call this recipe, it merely involves removing the center of a slice of bread (or other baked good) and cooking an egg in that space. This one is a little more gourmet, a bit more on the side of fine dining, some might say fancy pantsy with smoked salmon, capers and crème fraîche.
I wouldn’t leave out the crème fraîche like I did. Thought I was going to make the condiment then forgot to keep some of the heavy cream and buttermilk I had around (into another recipe they went). Yeah, that’s all it takes to make crème fraîche, heavy cream and buttermilk with a bit of time at room temperature. The recipe is pretty dry without it unless you have your egg over easy (my preferred way) but still. Maybe add a little fresh dill or chives.
As for the bread, the Real Simple recipe called for country bread. I came across Swedish limpa bread at our co-op which was perfect for this with the fennel, hints of orange, molasses, anise, and caraway. Don’t leave out the onion. I thought raw red onion would be too much but it was a welcome, strong flavor. Not too much smoked salmon which will overpower your bite. But do what you want. I thought the recipe called for too much smoked salmon-you could likely double your servings with the 4 ounces to get 4 eggies in a hole in place of the 2. (I’ll share the recipe that serves 4.)
When you get a bit of the buttery bread with your egg, the caper, a slice of onion and some of the smoked salmon (dip yours in the crème fraîche) there’s just this beautiful flavor. It makes a weekend breakfast (or lunch, snack, perhaps dinner) that much better. It’s also very attractive with the bright pops of color.
Egg in a hole with smoked salmon, capers and crème fraîche
Serves 4
Ingredients:
4 large slices of country bread (or your bread of choice-Swedish limpa was perfect)
2 tbsp unsalted butter
4 large eggs
1/4 to 1/2 cup crème fraîche (see above for recipe link)
4 oz. smoked salmon
2 tbsp capers
1/2 small red onion, thinly sliced
pepper
Cut a hole in the middle of your bread slices-about 3-inches-you can use a cookie cutter or small glass for this. Work in batches in a large nonstick skillet, 2 slices at a time. Melt half of the butter (1 tbsp) in the skillet over medium heat. Place 2 slices of bread in the skillet, crack an egg in each center and cook until the bread is golden and egg whites are set, 1 to 2 minutes per side. Place on plates. Do the remaining 2 slices the same way. Don’t forget to add that last 1 tbsp of butter to the skillet first.
While the last 2 slices are cooking, divide half of the smoked salmon, capers, red onion and crème fraîche with a dash of pepper to the plated batch and serve. Do this for the remaining slices and serve. If you have some fresh dill or chives you could top off the dish.